

Teacher cards / Activity 24
For teachers and helpers. Adult supervised. Not for student screens.Water Xylophone
How does the amount of water in a cup change its sound?

★The card
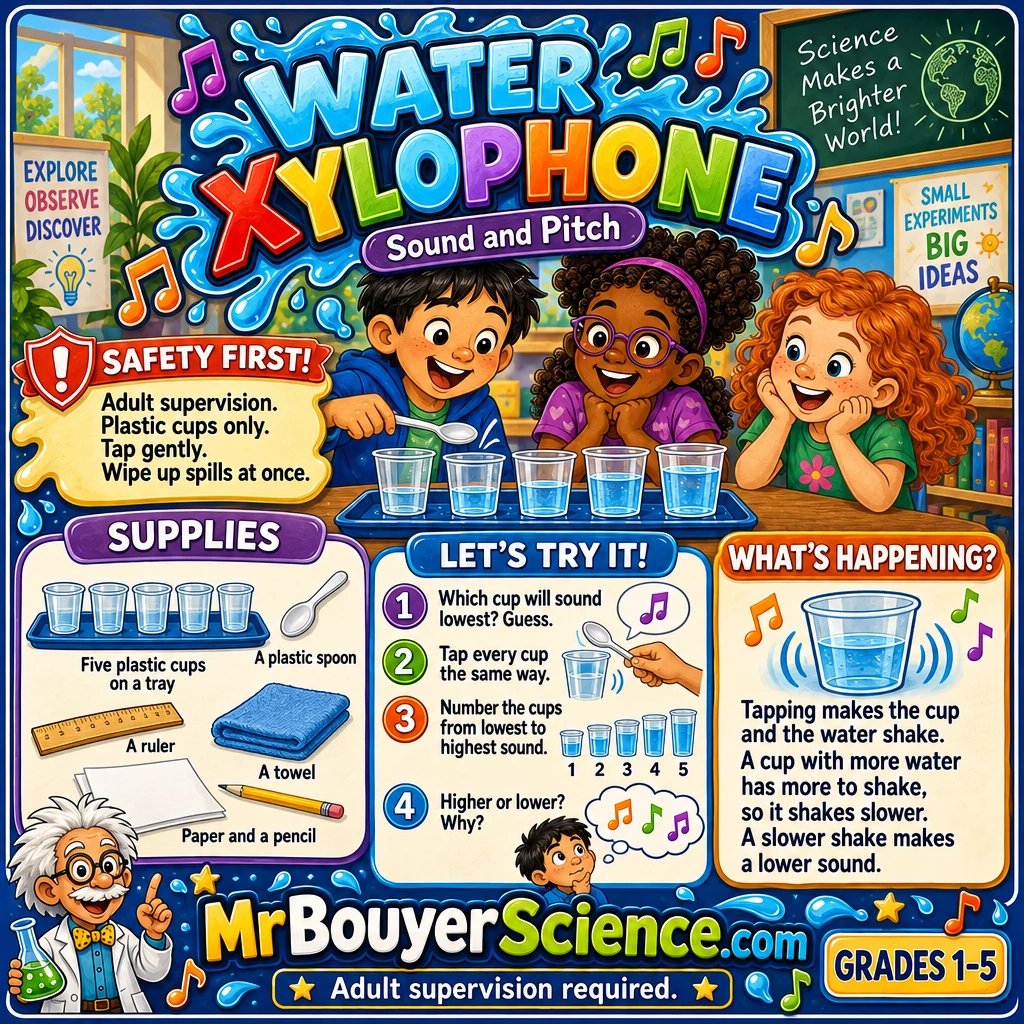
Put this card on the board for the class, or print it. Save the card
1Before class
The day before
- Build one xylophone yourself and tap every cup. It takes five minutes.
- Use plastic cups only. No glass. Pick sturdy clear cups. Very thin cups sound dull.
- Check each cup for cracks. Set any cracked cup aside.
- Tell the K to 5 teacher the floor may get wet. Children should wear shoes with a good grip.
- Give your helpers the helper guide on this page. Let them tap a set first.
Ten minutes before kids arrive
- Use a ruler and a marker to draw lines on the cups. Mark lines at 2 cm, 4 cm, 6 cm and 8 cm from the bottom of the cup. Leave one cup unmarked and empty. Use cups at least 10 cm tall.
- Put one tray on each group table or on a clear patch of floor.
- Fill four of the five cups to the lines with room temperature water. The fifth cup stays empty.
- Set the five cups in a row on the tray with a little space between them. Put them in a mixed up order.
- At each station set two plastic spoons, one small plastic jug of water, a ruler, pencils, paper and a folded towel.
- Keep a mop or large towel by the door.
- Put this card up on the board.
Safety and care
- An adult stays with every group for the whole activity. The K to 5 teacher is the responsible adult. Helpers are teenagers and lead the activity.
- Plastic cups only. No glass at all.
- Wet floors are a slip risk. Keep cups on trays. Wipe up every spill at once with a towel.
- Helpers do all the pouring. Children tap and listen.
- Tap gently so cups do not tip over. Never poke or pry with the spoons.
- Nothing is tasted or drunk. The water is not for splashing.
- Wash hands after the activity.
2Materials for 15 students
| Item | Per group | Whole class | Notes |
|---|---|---|---|
| Sturdy clear plastic cups, at least 10 cm tall | 6 | 30 | Five to use plus one spare. |
| Plastic spoons, sturdy | 2 | 10 | Tap with the back of the bowl. |
| Small plastic jugs of room temperature water | 1 | 5 | For the helper to add water. |
| Trays with a rim | 1 | 5 | Cups and spills stay on the tray. |
| Towels | 2 | 10 | One to dry the tray and one to wipe the floor. |
| Rulers | 1 | 5 | To check each water level. |
| Permanent marker | 1 | 1 | Teacher only, for marking lines before class. |
| Pencils | 3 | 15 | |
| Plain paper, folded in half | 3 | 15 | Each child records their own results. |
| Bucket for used water | 1 | The helper empties cups into it. |
How to set up the room
- Put each tray on a table or on a clear patch of floor. Spread the five stations apart.
- Seat each group of three around the tray so everyone can reach.
- Keep the jug and spare cups with the helper.
- Keep the mop or large towel by the door and the bucket where helpers can reach it.
3Run it in 30 minutes
Sit around the trays. Show the board. Ask for a guess. Which cup will make the lowest sound, the one with the most water or the least?
Helpers show how to tap the cup gently. Each child taps every cup and listens.
Check each water depth with the ruler and write it down. Tap each cup and number the cups from lowest to highest sound. Then the helper adds water to one cup. Tap it again. Did the note go lower?
Bring the class together. Compare the orders. Ask why more water makes a lower sound.
Helpers empty the cups into the bucket. Dry the trays. Wipe up. Wash hands.
4What the kids do
- Look at the cups. Which one will sound lowest? Make a guess.
- Tap one cup gently with a spoon. Listen.
- Tap each cup. Use the same spoon and tap in the same place.
- Measure the water in each cup with the ruler. Write the numbers.
- Number the cups from lowest to highest sound.
- Your helper adds a little water to one cup. Tap it again.
- Did the sound go higher or lower? Why do you think so?
Match it to the grade
Tap the cups and say high or low. Line up the cups from least water to most water. Listen as you go.
Measure the water in centimeters. Number the cups from lowest to highest sound. Say how the order follows the water.
Record the water depth and the sound order in a table. Predict what happens when you add water, then test. Name what you changed and what stayed the same.
5Helper guide for older students
Your job
- Lead one group of three. Build a set the day before and play it first.
- Do all the pouring and the water adding yourself.
- Give each child a job. One taps. One listens. One writes.
- Ask questions and let the children try before you explain.
- Wipe up spills at once and tell the teacher about any puddle.
Say things like this
- What do you think will happen? Why?
- Is that sound high or low?
- Which cup has the most water? Does it sound lowest?
- Let us change one thing and try again.
Please do not
- Do not let a child pour water.
- Do not give away the answer before they test it.
- Do not tap so hard that a cup tips.
- Do not leave water on the floor.
- Do not say a guess is wrong. Say let us test it.
6Talk it over
Questions to ask
- Which cup sounded lowest? Which sounded highest?
- What was different about those two cups?
- What happened to the sound when we added water?
- What did we change? What stayed the same?
- Where have you heard high and low sounds, like in music?
- Grades 4 and 5. Why might tapping hard make the sound louder but not change the note?
The science, in plain words
When you tap a cup, the cup and the water in it vibrate. The vibration pushes on the air and you hear sound. The number of vibrations in a second is the pitch. A cup with more water has more mass to move, so it vibrates more slowly and the pitch is lower. A cup with less water vibrates faster and the pitch is higher. Tapping harder makes the sound louder but does not change the note much. If you blow across the top of a bottle instead of tapping it, the effect is the opposite, because the air inside the bottle is vibrating.
Where you see it
- A glass harmonica makes music from glasses with different water levels.
- Xylophone bars are cut to different lengths to make different notes.
- A pipe organ has tall pipes for low notes and short pipes for high notes.
7If it goes wrong
| What you see | What to do |
|---|---|
| The sounds are dull and all the same | Use a harder cup or tap with the back of a plastic spoon. Tap near the rim. |
| The notes do not seem different | Compare the empty cup with the fullest cup first. Listen to those two. |
| A cup tips over | Space the cups out on the tray. Tap more gently. |
| Water spills on the floor | Wipe it up at once. Tell the teacher. Keep the tray in place. |
| The water level is not on the line | The helper adds or pours out a little. Check again with the ruler. |
| A cup cracks | Set it aside for the teacher. Use a spare cup. |
Clean up
- Helpers empty the cups into the bucket
- Dry the trays and the cups
- Wipe up any water on the floor
- Count the cups and spoons back in
- Return rulers and pencils
- Wash hands
Go further
- Add a second spoon and play a tune with two spoons.
- Try a spoon with a metal handle against a plastic spoon. Does the note change? An adult handles the metal spoon.
- Use a taller cup. Is the note higher or lower with the same water?
- Tap two cups with the same water and compare the sounds.
Built by Science Fenns for teachers and student helpers. Keep supervising every group the whole time.