

Teacher cards / Activity 35
For teachers and helpers. Adult supervised. Not for student screens.Seeds in a Bag
What does a seed need to wake up and start to grow?

★The card
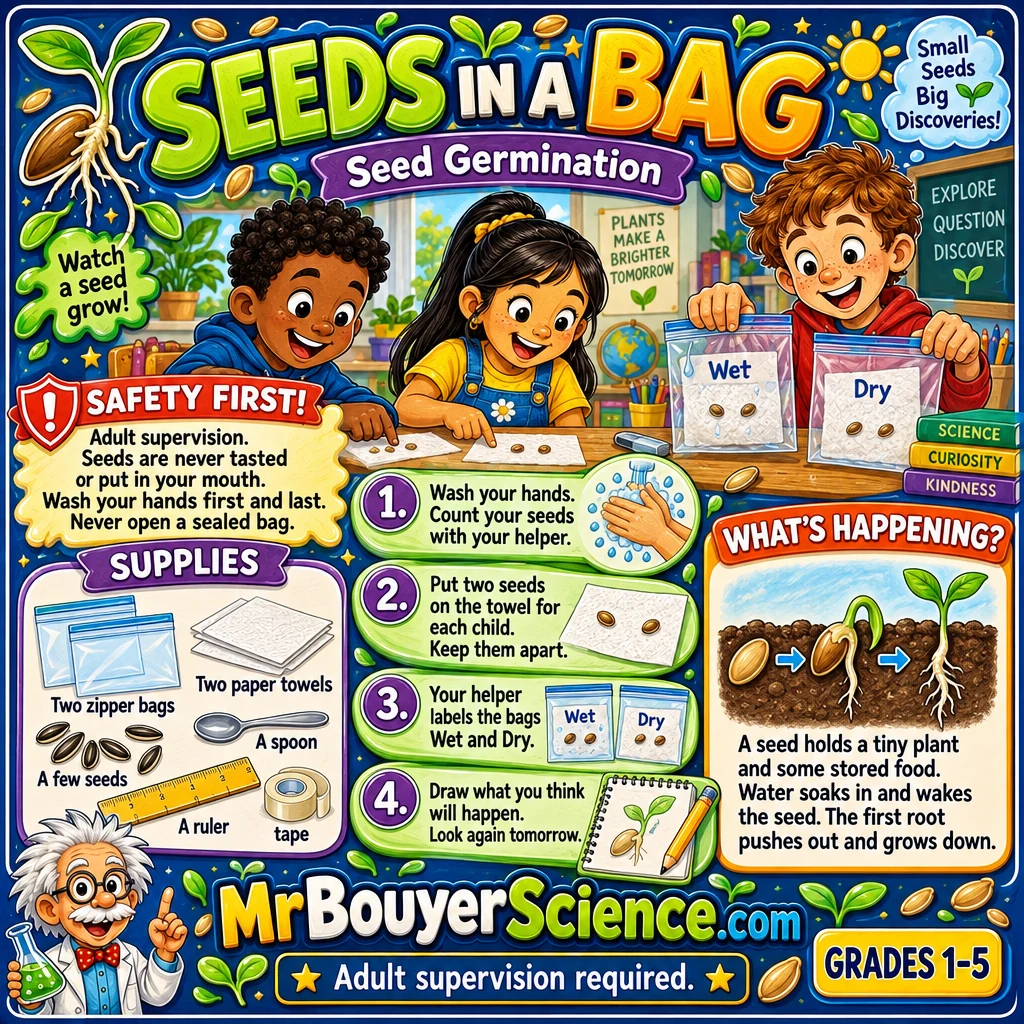
Put this card on the board for the class, or print it. Save the card
1Before class
The day before
- Ask about allergies to seeds, pollen, mold and plant sensitivities. Ask the families if you are not sure.
- Radish seeds are in the mustard family. If any child has a seed or mustard allergy, use plain grass seed instead. That child can also be the recorder and never touch the seeds.
- Buy untreated seeds. Garden seed is sometimes coated with a fungicide. Look for seeds sold for sprouting or labeled untreated.
- Count seeds into five small cups ahead of time. Count out a few spares for your kit.
- Set up one wet bag and one dry bag yourself two or three days before. You will know what the children should see.
- Plan a spot on a window sill or a warm shelf. Seeds need warmth more than light.
- Give your helpers the helper guide on this page. Let them make a bag first.
Ten minutes before kids arrive
- Count twelve seeds into a small cup for every group. Keep the spares in your kit.
- Fold paper towels in half and in half again so they fit inside a quart bag. Make two for every group.
- Put two zipper bags, two folded towels, a measuring teaspoon and a small cup of cool tap water on every tray.
- Tear six strips of masking tape and stick them to the edge of every tray.
- Set a ruler, a permanent marker, pencils, paper and paper towels at every group.
- Clear a space at the window and wipe the glass dry so the tape will stick.
- Draw a class chart on a big sheet of paper. Use one row for each day. Do not put names on the chart.
- Put this card up on the board.
Safety and care
- An adult stays with every group for the whole activity.
- The K to 5 teacher is the responsible adult in the room. Helpers are teenagers and work with the teacher.
- Check for seed, mustard family, pollen and mold allergies before you open the seeds. Use grass seed if there is any concern.
- Seeds are small. They are a choking risk for young children. Count them out and count them back in. Nothing is tasted. Nothing goes in mouths.
- Use untreated seeds only. Do not use seeds from a treated packet.
- No beans and no nuts in this activity. Use only radish or grass seed.
- Wash hands with soap before touching the seeds and again after the bags are sealed and taped.
- Bags are sealed and taped shut. They are never opened. If a bag grows fuzzy mold, do not open it and do not sniff it. The teacher puts the whole sealed bag in the trash.
- Only the helper uses the permanent marker. Keep the cap on when not writing.
- Bags never go over a head or face. Wipe up spills at once. Wet floors are a slip risk.
2Materials for 15 students
| Item | Per group | Whole class | Notes |
|---|---|---|---|
| Radish seeds, untreated | 12 | 60 | Or plain untreated grass seed. Count out a few spares for your kit. |
| Quart zipper bags | 2 | 10 | One wet bag and one dry bag. Keep a few spares. |
| Paper towels, folded to fit the bag | 2 | 10 | One goes in each bag. |
| Paper towels, whole sheets | 3 | 15 | For spills and drying hands. |
| Cool tap water in a small cup | 1 | 5 | About a quarter cup is plenty. |
| Measuring teaspoons | 1 | 5 | Two teaspoons of water for the wet bag. |
| Masking tape strips | 6 | 1 roll | Tear the strips ahead and stick them on the tray edge. |
| Rulers with millimeters | 1 | 5 | For measuring roots in the days that follow. |
| Permanent marker, low odor | 1 | 5 | Helper only. Labels the bags Wet and Dry and the group number. |
| Trays | 1 | 5 | A baking sheet or lunch tray catches spills. |
| Pencils | 3 | 15 | |
| Plain paper, folded in half | 3 | 15 | Each child draws and records. |
| Class chart paper | 1 | One sheet. Rows for each day. No names. | |
| Trash bag | 1 | The sealed bags go in whole when the week is over. |
How to set up the room
- Seat each group of three around a tray at a table or on the floor.
- Keep the window area clear. Move blind cords out of reach.
- Post the class chart where the teacher can reach it and children can see it.
- Plan a spot where every group can tape its two bags side by side.
3Run it in 30 minutes
Groups sit at their trays. Show the board. Ask what a seed needs to wake up. Water, sun, soil, or something else.
Wash hands. Each child gets two seeds for each bag. Count them into the bag. Measure two teaspoons of water.
Each group makes two bags. The wet bag gets the damp towel. The dry bag gets a dry towel. Seeds go in the same spots in both. Seal and tape the bags.
Helpers label each bag. Tape both bags flat on the window side by side. Put the starting row on the class chart. Roots are zero millimeters.
Talk about what will happen. Wipe trays. Wash hands. The teacher checks the bags each day and fills in the chart.
4What the kids do
- Wash your hands. Count your seeds with your helper.
- Measure two teaspoons of water onto the towel for the wet bag. Leave the other towel dry.
- Lay each towel flat inside its bag. Place two seeds on it for each child. Keep them apart.
- Seal both bags with a little air inside. Your helper tapes the zippers shut.
- Your helper labels the bags Wet and Dry and the group number.
- Tape both bags flat on the window side by side.
- Draw what you think will happen. Look again tomorrow and draw what you see.
Match it to the grade
Count the seeds. Draw the bags. Say the words seed, water and root together. Look tomorrow and point to roots. Talk about what plants need.
Count the seeds in each bag. Measure the water in teaspoons. Each day measure the longest root in millimeters through the bag. Fill the class chart.
Record root length each day for a week. Graph the wet bags. Find the day the first root showed. Explain why the dry bag stayed the same.
5Helper guide for older students
Your job
- Lead one group of three. Make one bag yourself first.
- Wash hands first with the group. Count the seeds in and count them out.
- Measure the water with the group. Let the children try before you do it.
- Seal and tape the zippers. Write Wet or Dry and the group number on each bag.
- Keep the marker cap on and the marker with you.
Say things like this
- What do you think the seed needs?
- What is different about these two bags?
- Let us wait and see.
- That is a good guess. How could we test it?
Please do not
- Do not let anyone taste or smell the seeds.
- Do not open a sealed bag.
- Do not leave seeds on the floor. Count every one.
- Do not give away the answer before they look.
- Do not say a guess is wrong. Say let us test it.
6Talk it over
Questions to ask
- What is different about the two bags? What is the same?
- Which seeds do you think will grow roots first? Why?
- What does a seed need that it cannot make itself?
- Why did we keep the bags the same except for the water?
- Where do seeds grow in nature? Where does their water come from?
- Grades 4 and 5. A seed has stored food inside. Why does it still need water to use it?
The science, in plain words
A seed holds a baby plant called an embryo and a store of food. It stays quiet until it gets water and enough warmth. Water soaks into the seed and makes it swell. Then the seed starts to use its stored food. The first part to push out is the root. A shoot follows later. Most seeds do not need light to start. Light matters once the green shoot comes up. The dry bag has everything except water, so the seeds stay unchanged. That is a fair test because only one thing was changed. The bags are sealed, so they hold their moisture for several days. Warm damp spots can also grow mold on the towel. That is why the bags are never opened. Radish seeds often show a root within a few days. Grass seed is slower.
Where you see it
- A garden seed sleeps in dry soil until rain arrives and wakes it.
- A farmer plants seeds in damp ground, not in a dry field.
- Grass seed on a lawn needs watering to start. Dry seed lies there unchanged.
7If it goes wrong
| What you see | What to do |
|---|---|
| No roots show after several days | Check the towel is still damp. Move the bags to a warmer spot. Radish usually shows roots sooner than grass. |
| The dry bag grows a root | The towel may have picked up moisture from the air or from a spill. This is a good talk point. Ask what might have happened. |
| The towel looks fuzzy or slimy | That is mold. Do not open the bag and do not sniff it. The teacher puts the whole sealed bag in the trash. Use a spare bag if you need one. |
| The seeds slide to the bottom of the bag | Tape the bag flat at the top and bottom. Hang it so the seeds stay near the top. |
| The towel dried out in the wet bag | Use only two teaspoons next time. A sealed bag holds the water, but a gap in the zipper lets it out. Seal and tape it again. |
| A child wants to open the bag to look | Say we can see through the bag. Opening it lets in mold. Use the ruler through the plastic instead. |
Clean up
- Count the seeds back in. None go home and none are left on the floor
- Wipe up every drop of water
- Return markers, rulers and tape to the kit
- Throw away the paper towels
- Wash hands
- Check that both bags are sealed and taped flat on the window
Go further
- Try a second test. Put one bag in a warm spot and one in a cooler spot. Which wakes first?
- Try a bag with the towel very damp and one with the towel only a little damp. Does it matter?
- Cover one wet bag with a sheet of paper. Do roots grow without light?
- Draw the seeds every day for a week and make a picture book.
Built by Science Fenns for teachers and student helpers. Keep supervising every group the whole time.