
Teacher cards / Activity 33
For teachers and helpers. Adult supervised. Not for student screens.Rock Detectives
How can we tell one rock from another?

★The card
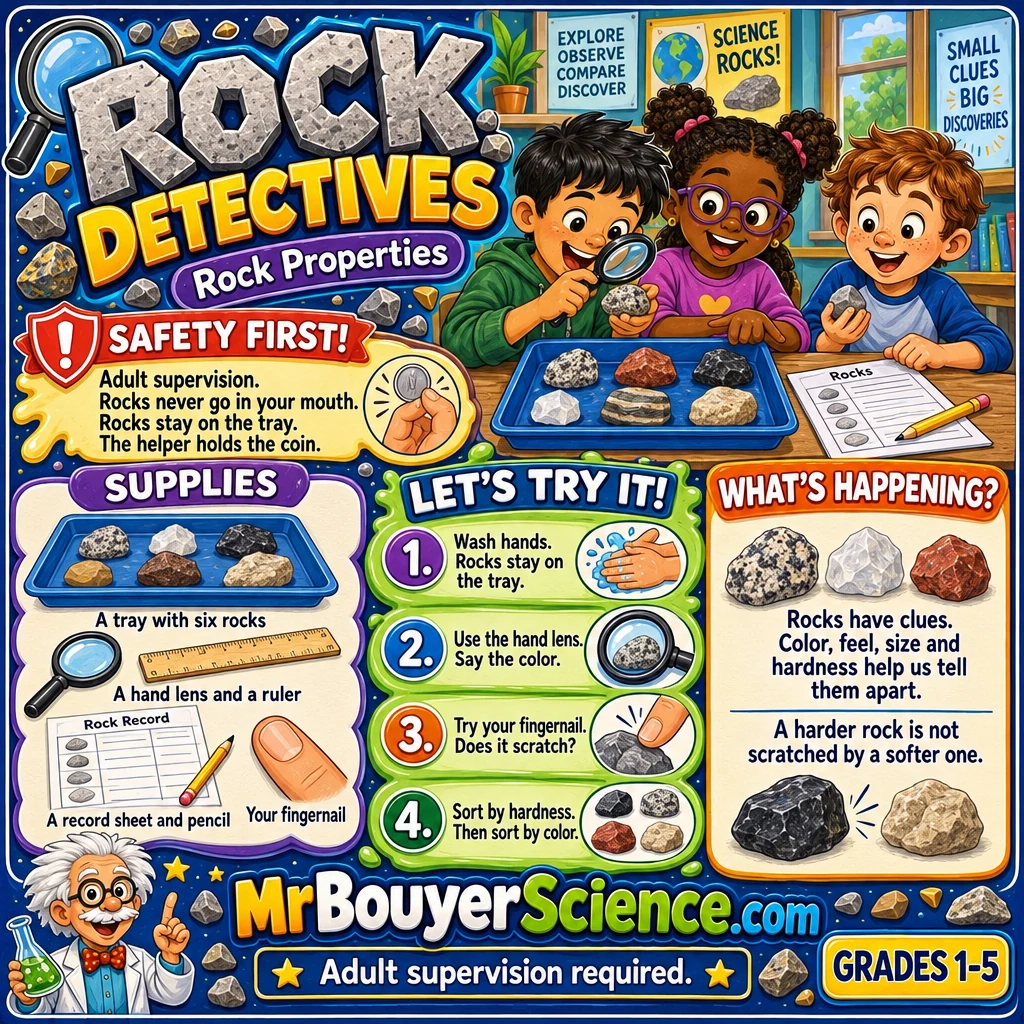
Put this card on the board for the class, or print it. Save the card
1Before class
The day before
- Collect or buy small smooth rocks. Tumbled rocks or river rocks are best. Each rock must be at least four centimeters across, about the size of a golf ball or bigger.
- Run your thumb over every rock. Remove any rock with a sharp edge, a point or a chip.
- Wash the rocks and let them dry. Dry rocks show color and texture best.
- Make six identical sets of rocks. Every group needs the same six kinds so groups can compare. Mark them A to F with a dot of marker on tape.
- Do the tests yourself. Find which rocks the fingernail scratches and which the coin scratches. It takes ten minutes.
- Tape one copper colored coin flat on an index card for each group. Count the coins and cards in and out.
- Give your helpers the helper guide on this page. Let them try the tests once.
Ten minutes before kids arrive
- Cover each table with a towel or a layer of paper towels.
- Set one tray in the center of each table.
- Place the six rocks, A to F, in each tray.
- At every table set three hand lenses, a ruler, a sorting mat, three pencils and three record sheets.
- Give each helper the coin card for the table. The helper keeps it.
- Set a trash bag near the door for paper towels.
- Put this card up on the board.
Safety and care
- The K to 5 teacher is the responsible adult. Helpers are teenagers and lead the activity only. An adult stays in the room the whole time.
- A rock never goes to a mouth. No tasting, no licking, no holding against the face.
- All rocks are smooth and at least four centimeters across. Do not use sharp edged rocks. Check each rock before class.
- The coin card stays with the helper. A helper does the coin scratch while the child watches.
- Rocks stay on the tray. No throwing and no banging rocks together. Sit while you work so a dropped rock does not land on toes.
- Never aim a hand lens at the Sun or a window. Keep lenses away from bright light.
- Scratching makes a little fine dust. Scratch gently over the tray. Do not blow on the rocks.
- Wash hands before and after the activity.
2Materials for 15 students
| Item | Per group | Whole class | Notes |
|---|---|---|---|
| Smooth rocks, 4 centimeters or bigger | 6 | 30 | Make six identical sets. A to F. |
| Hand lenses | 3 | 15 | Plastic is fine. One for each child. |
| Copper colored coin taped to an index card | 1 | 5 | Pennies from before 1982 are nearly all copper. Newer pennies are copper coated. Both work for a rough test. |
| Trays | 1 | 5 | A shallow box lid works. It catches the dust. |
| Rulers | 1 | 5 | Centimeters side. |
| Sorting mats | 1 | 5 | Paper with three boxes for soft, medium and hard. |
| Pencils | 3 | 15 | |
| Record sheets | 3 | 15 | A table with a row for each rock A to F. |
| Towels or paper towels | 1 | 5 | Covers the table. |
| Marker and tape for rock labels | 1 | Teacher labels the rocks before class. | |
| Trash bag | 1 | For paper towels. |
How to set up the room
- Set five tables with chairs. Leave a clear walkway between tables.
- Seat each group of three around its tray. The helper sits beside the tray.
- Keep the hand washing sink or wipe station clear and close to the door.
- Put the board where every child can see it.
3Run it in 32 minutes
Groups sit at their trays. Wash hands. Show the board. Ask what clues help us tell rocks apart.
Pick up rock A. Use the hand lens. Say the color. Feel the surface. Measure the width in centimeters. Record it.
Fingernail test by the child. Coin test by the helper. Record soft, medium or hard for each rock.
Sort rocks onto the mat by hardness. Then sort again by color only. Compare the two sorts.
Rocks back in the tray. Count the rocks and coins in. Wash hands.
4What the kids do
- Wash your hands. Sit with your tray. The rocks stay on the tray.
- Predict. Which rock in your tray is hardest? Which is softest? Write the letters.
- Pick up rock A. Use the hand lens. Say its color and what you see.
- Feel it with your fingers. Is it smooth, gritty, sparkly or bumpy?
- Measure how wide it is in centimeters. Write it on your sheet.
- Fingernail test. Press your nail gently. Does it leave a scratch? Write yes or no.
- Coin test. The helper presses the coin. Does it leave a scratch? Write yes or no.
- Sort by hardness on the mat. Then sort again by color only. Say what changed.
Match it to the grade
Look and feel. Say a color word and a feel word for each rock. Sort the rocks into big and small piles.
Measure each rock in centimeters. Do the fingernail test. Sort the rocks into soft and hard.
Record color, texture, width and hardness in a table. Sort three ways and say which property was most useful. Explain why color alone can mislead.
5Helper guide for older students
Your job
- Lead one group of three. Do the tests the day before so you know the answers.
- Keep the coin card in your hand. You do the coin scratch.
- Give each child a job. One tests. One records. One measures. Rotate.
- Ask questions and let the children try before you explain.
- Check each rock is back on the tray before the next one comes out.
Say things like this
- What clue do you see on this rock?
- Is it smooth or gritty? Show me.
- Let us change one thing and try again.
- That is a good guess. How could we test it?
Please do not
- Do not let any rock go near a mouth.
- Do not hand the coin to a child.
- Do not name the rocks for them. The clues come first.
- Do not take the rock out of a child's hands. Help with your hands over theirs.
- Do not say a guess is wrong. Say let us test it.
6Talk it over
Questions to ask
- Which rock looked the most different from the others? What made it different?
- Which rock was the hardest? How do you know?
- What did we change when we sorted the second time? What stayed the same?
- Did color tell us how hard the rock was?
- Where have you seen rocks used at home or in town?
- Grades 4 and 5. Why do geologists test more than one property before they name a rock?
The science, in plain words
A rock is a solid made of one or more minerals. We can tell rocks apart by their properties. Color is the easiest to see but it can mislead, because the same kind of rock can come in different colors. Texture tells us about the grains. A rock can feel smooth, gritty or sparkly. Hardness tells us how easily it scratches. Geologists use a scale from 1 to 10 called the Mohs scale. A fingernail is about 2.5 and a copper coin is about 3. If a nail scratches a rock, the rock is softer than a nail. If a coin scratches it but a nail does not, the rock is in the middle. If neither scratches it, the rock is harder. A real scratch is a groove that stays. Metal from the coin can leave a streak that wipes off. That is not a scratch. Test in a hidden spot and rub the mark with a finger to check. This is a rough classroom test. It sorts rocks into groups but it does not name them.
Where you see it
- Marble is a softer rock and is carved into statues.
- Granite is a hard rock and is used for kitchen counters.
- Limestone is used for buildings across Texas.
7If it goes wrong
| What you see | What to do |
|---|---|
| Nothing scratches any rock | The rocks may be very hard. That is a good result. Write hard and move on. |
| Everything seems to scratch | Check for coin streaks. Rub the mark with a finger. A real scratch stays. |
| Two groups got different answers | Good. Test again with a helper. Press with the same push and use the same spot. |
| A rock has a sharp edge | Set it aside. Replace it with a smooth rock. |
| Children want to taste or lick a rock | Stop. Remind the group. No rock goes near a mouth. Wash hands. |
| A hand lens points at bright light | Turn it away. Never aim a lens at the Sun or a window. |
Clean up
- Put every rock back in its tray
- Count the rocks A to F
- Count the coin cards back in
- Collect lenses, rulers and pencils
- Throw away paper towels
- Wash hands
Go further
- Add a rock from home or the school yard. Test it the same way.
- Sort by weight. Hold two rocks and guess which is heavier.
- Rub two soft rocks together over the tray. Look at the dust with the hand lens.
- Make a rock museum. Label each rock with its properties.
Built by Science Fenns for teachers and student helpers. Keep supervising every group the whole time.