
Teacher cards / Activity 19
For teachers and helpers. Adult supervised. Not for student screens.Magnet Mystery
What do magnets stick to and what do they ignore?

★The card
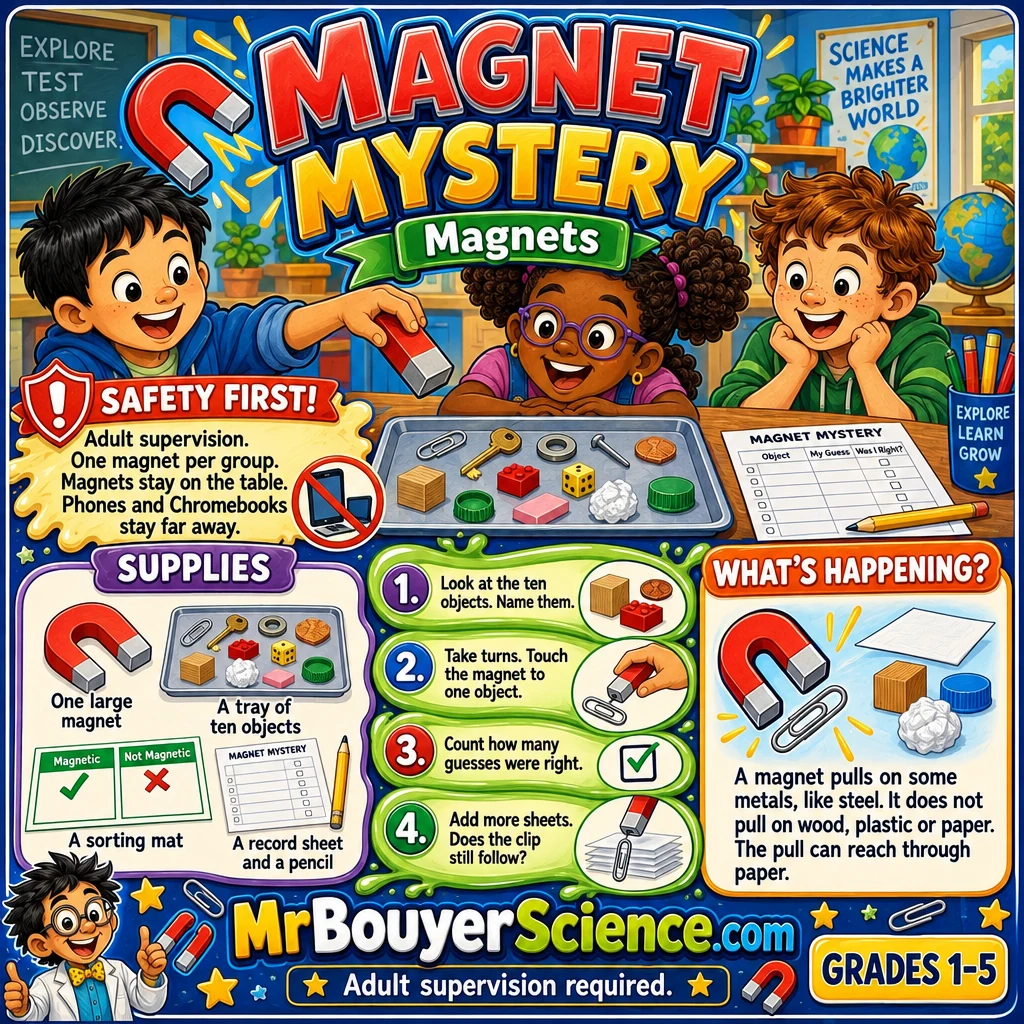
Put this card on the board for the class, or print it. Save the card
1Before class
The day before
- Test every object with your own magnet before class. Some steel items do not stick. Swap out any surprise.
- Check that each magnet is large, solid and not cracked. Use classroom bar or horseshoe magnets. Do not use tiny strong magnets.
- Count every object into each tray. Count them out again at the end.
- Plan where phones, Chromebooks, watches and cards will wait during class. A bag or box across the room works well.
- Ask whether any adult in the room has a pacemaker or other medical device. Those adults stay well back from the magnets.
- Give your helpers the helper guide on this page. Let them sort and test the objects first.
Ten minutes before kids arrive
- Tear or draw a line down the middle of five large sheets of paper. Write Sticks on one side and Does not stick on the other. An adult writes the labels.
- Fill five trays with ten objects each. Four are steel and six are not.
- Put one magnet, one tray and one sorting mat at each group's table. Keep the magnet in your hand until the activity starts.
- Set out ten scrap sheets, three pencils and three folded record sheets at each table.
- Put the bag or box for phones and Chromebooks on a far shelf.
- Put this card up on the board.
Safety and care
- An adult stays with every group for the whole activity. The K to 5 teacher is the responsible adult in the room. Helpers are teenagers.
- Keep phones, Chromebooks, watches, bank cards and school ID cards far from the magnets. Magnets can harm them.
- Use one magnet per group. Two large magnets can snap together and pinch fingers. Keep spare magnets in the kit.
- Magnets stay on the table. A dropped magnet can chip or crack.
- Nothing goes in mouths. Choose objects too big to fit in a child's mouth. Count every one in and out.
- Adults with a pacemaker or other medical device stay a good distance from the magnets.
- Wash hands before and after the activity.
2Materials for 15 students
| Item | Per group | Whole class | Notes |
|---|---|---|---|
| Large bar or horseshoe magnet | 1 | 5 | Solid classroom magnet. Too big to swallow. No tiny strong magnets. |
| Steel objects. 2 inch fender washer, 3 inch bolt, large binder clip, jumbo paper clip | 4 | 20 | Test each one with your magnet first. |
| Objects that do not stick. Wooden craft stick, plastic spoon, eraser, aluminum foil ball, crayon, large plastic lid | 6 | 30 | Make the foil ball as big as a golf ball. |
| Tray or box lid for the objects | 1 | 5 | |
| Large sheet of paper for the sorting mat | 1 | 5 | Adult writes Sticks and Does not stick. |
| Scrap paper sheets | 10 | 50 | Used to test if a magnet pulls through paper. |
| Pencils | 3 | 15 | |
| Record sheets, plain paper folded in half | 3 | 15 | Each child records their own results. |
| Bag or box for phones and Chromebooks | 1 | Keep it across the room. |
How to set up the room
- Seat each group of three around a table or on the floor around a mat. Keep the groups at least two meters apart so magnets stay away from each other.
- Keep devices in the far corner of the room.
- Leave walking space so helpers can move between groups.
- Put the board with this card where every group can see it.
3Run it in 30 minutes
Groups sit with their trays. Show the board. Ask what a magnet will stick to. Show the magnet and keep it in your hand.
Each child picks up objects and places them on the mat. Left side means I think it sticks. Right side means I think it does not.
One child holds the magnet. Another picks the object. The third moves it to the right side of the mat if the guess was wrong. Count how many guesses were right.
Lay the jumbo paper clip on the table. Cover it with one sheet of paper. Slide the magnet over the paper. Add sheets and try again.
Bring the class together. Ask what the sticky things had in common.
Count every object back into the tray. Put the magnets in the kit. Wash hands.
4What the kids do
- Look at your ten objects. Name each one and say what it is made of.
- Predict. Put each object on the mat. Left side means I think the magnet will stick. Right side means I think it will not.
- Take turns. One child holds the magnet and touches it to one object at a time.
- If the object sticks, lift it and look. Move any wrong guess to the correct side of the mat.
- Count how many guesses were right. Write the number on your record sheet.
- Change one thing. Lay the jumbo paper clip on the table and cover it with one sheet of paper. Slide the magnet over the paper.
- Add one more sheet at a time. Try one sheet, five sheets and ten sheets. Does the clip still follow?
Match it to the grade
Sort the objects into sticks and does not stick. Say magnet, pull and push. Count how many stuck.
Predict for every object. Test and count the right guesses. Say one thing the sticky objects share.
Record the result in a table. Find what fraction of guesses were right. Explain why the paper test kept working and what might make the pull stop.
5Helper guide for older students
Your job
- Lead one group of three. Sort and test the objects yourself the day before.
- Keep your group's magnet in your hand until it is time to test.
- Give each child a job. One holds the magnet. One picks the object. One moves the object and counts.
- Ask what they think before they test.
- Count the objects out and back in at the end.
Say things like this
- What do you think will happen? Why?
- What is it made of?
- Let us test it and see.
- That is a good guess. How could we check?
Please do not
- Do not tell them the answer before they test.
- Do not let magnets near phones or Chromebooks.
- Do not let two magnets come together.
- Do not say a guess is wrong. Say let us test it.
- Do not let anyone put an object in their mouth.
6Talk it over
Questions to ask
- Which things stuck? What did they have in common?
- Did anything surprise you? What did you expect?
- Did the magnet stick to every metal thing? Why do you think so?
- What happened when we put paper between the magnet and the clip?
- Where do you see magnets at home or at school?
- Grades 4 and 5. Why might the clip stop following if we added many more sheets?
The science, in plain words
A magnet attracts objects that contain iron. Steel is mostly iron, so steel objects stick. Aluminum, wood, plastic, paper and crayon wax do not stick. Not all metals are magnetic. Some stainless steel items do not stick, which is why you test everything first. The pull of a magnet gets weaker with distance. A large classroom magnet still pulls through a few sheets of paper because the gap is tiny.
Where you see it
- A refrigerator door holds a seal shut with magnets.
- A compass needle is a small magnet that lines up with Earth.
- Recycling plants use big magnets to pull steel cans away from other waste.
7If it goes wrong
| What you see | What to do |
|---|---|
| Nothing sticks | Check the object. It may not be steel. Try the paper clip or the bolt first. |
| The magnet sticks to the wrong thing | Look for a hidden metal part, like a staple or a metal band. Talk about it. |
| The clip will not follow through the paper | Slide the magnet more slowly. Use fewer sheets. Try a flat clip. |
| Two magnets snap together | Pull them apart by sliding, not pulling straight. Put one away. |
| An object rolls off the table | Keep the work on the mat. Pick it up and count it back. |
| A device is near the magnets | Move the device to the far shelf right away. Do not carry the magnet toward it. |
Clean up
- Count every object back into the tray
- Put the magnets in the kit and keep them apart
- Collect the record sheets
- Recycle the scrap paper
- Wash hands
Go further
- Test more classroom objects. Make a prediction list first.
- Try a magnet through a plastic lid or a wooden stick. Does it still pull?
- Slide a paper clip across the table with a magnet underneath a thin plastic tray.
- Make a Sticks and Does not stick poster for the room.
Built by Science Fenns for teachers and student helpers. Keep supervising every group the whole time.