

Teacher cards / Activity 29
For teachers and helpers. Adult supervised. Not for student screens.Floating Paper Clip
How can a metal paper clip float on water?

★The card
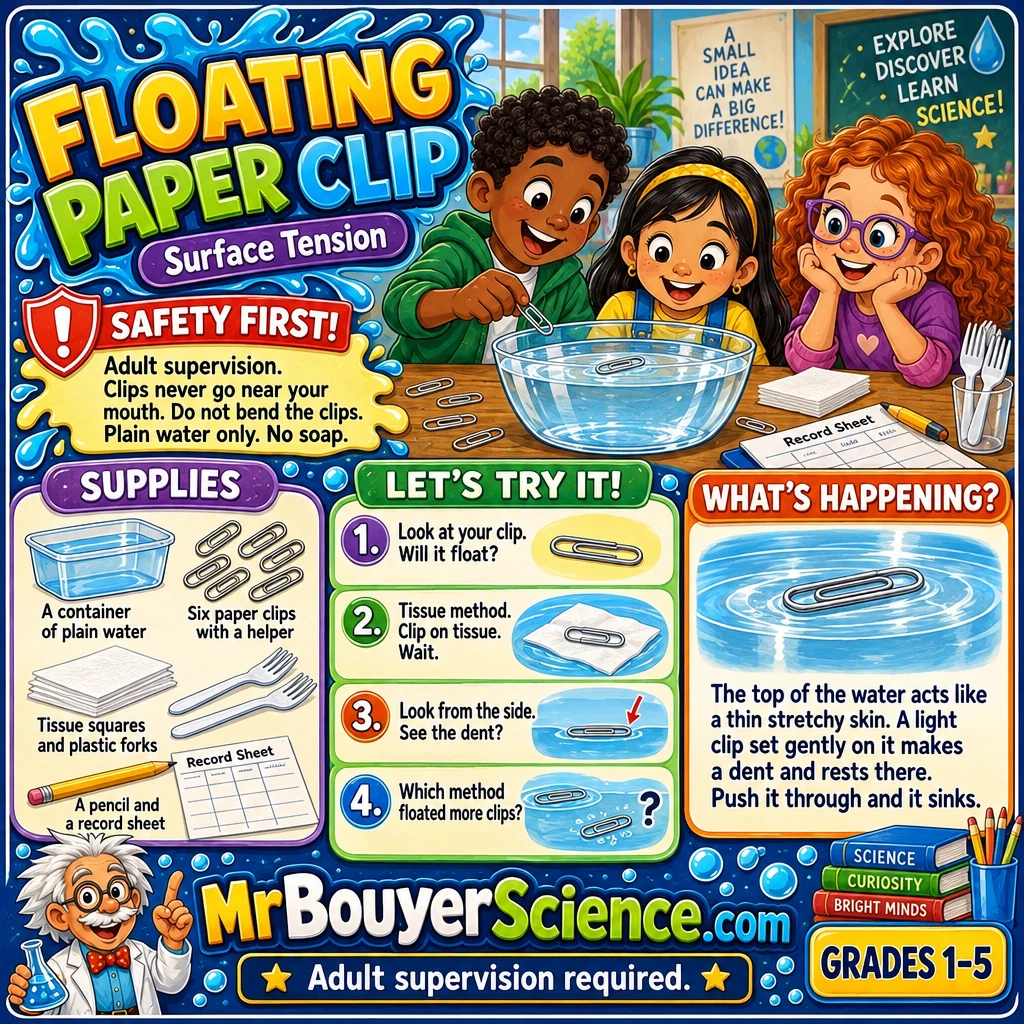
Put this card on the board for the class, or print it. Save the card
1Before class
The day before
- Practice both tricks yourself before class. The fork trick takes a few tries.
- Count the paper clips. Thirty clips go out. Thirty clips come back.
- Use plain steel paper clips. Clean, dry clips float best. Wipe each one with a dry paper towel.
- Wash cups and containers with plain water only. Soap film makes the clips sink.
- Give your helpers the helper guide on this page. Let them float a clip first.
- Ask the K to 5 teacher to plan for the youngest children to have a helper beside them at all times.
Ten minutes before kids arrive
- Set one tray on each table. Five tables, five trays.
- Put a clear container or wide cup on each tray. An adult fills it with about 6 centimeters of room temperature tap water.
- Set six clips in a small cup beside each container. The helper owns that cup.
- Put two plastic forks, four tissue squares, three pencils and three record sheets at every tray.
- Lay a few paper towels on the table under each tray for drips.
- Place a tray with paper towels at the front where dry clips come to rest.
- Put this card up on the board.
Safety and care
- The K to 5 teacher is the responsible adult in the room. The high school helpers lead the activity but they are not adults.
- Paper clips are small metal parts. The helper counts them out and counts them back in. Clips stay out of mouths, noses and ears.
- Do not bend or open the clips. Bent clips have sharp ends.
- Plain water only. Nothing is added to the water. Nothing is tasted or drunk. Keep soap off the trays and away from the water.
- Plastic forks stay flat on the table or above the water. Tines never point at faces.
- Water on the floor is a slip risk. Wipe drips at once. Children stay seated.
- Wash and rinse hands well before. Clean hands help the clips float. Wash again after. Do this at the sink away from the cups.
2Materials for 15 students
| Item | Per group | Whole class | Notes |
|---|---|---|---|
| Clear plastic containers or wide cups, 9 ounce or larger | 1 | 5 | A wide mouth is easier. Clear sides let children look from the side. |
| Plain steel paper clips | 6 | 30 | Count in and out. Not coated. Not bent. Two are spares. |
| Plastic forks | 2 | 10 | A blunt table fork also works. |
| Tissue squares, plain and unscented, about 8 centimeters wide | 4 | 20 | Plain tissue or lens paper. No lotion. |
| Room temperature tap water | About 1 cup | About 1.5 liters | Fill about 6 centimeters deep. Keep extra for refills. |
| Trays with a rim | 1 | 5 | They catch drips. |
| Small cup for the helper to hold clips | 1 | 5 | Helps count clips in and out. |
| Paper towels | 6 sheets | 1 roll | For drying clips and wiping drips. |
| Pencils | 3 | 15 | Children use the eraser end to nudge a tissue. Nobody uses a sharp point. |
| Plain paper record sheets | 3 | 15 | Each child records their own tries. |
| Hand lenses, optional | 1 | 5 | For looking at the dent from the side. |
| Trash bag | 1 | For used tissue. |
How to set up the room
- Use five tables with one tray in the middle of each. Seat three children around each tray with one helper.
- Children sit so they can look at the water from the side at eye level.
- Keep tables still. A bump sinks the clip.
- Set the sink nearby so children can wash and rinse hands before and after.
3Run it in 30 minutes
Show the board. Ask for a guess. Will a metal paper clip float or sink? Each child sets one clip straight into the water and watches it sink. The helper lifts it out.
Each helper floats one clip with the tissue and one with the fork while the group watches from the side.
Children try the tissue method first. Then the fork method. Then they add clips one at a time and count how many float before one sinks.
Bring the class together. Compare the two methods. Ask why gentle matters.
Count every clip back in. Dry the clips. Dump the water and wash hands.
4What the kids do
- Look at your clip. Predict. Will it float or sink?
- Set the clip straight down on the water. Watch it sink. Your helper takes it out.
- Tissue method. Lay a tissue flat on the water. Rest a dry clip on the tissue. Wait for the tissue to sink. The helper can nudge its edge with the eraser end of a pencil.
- Fork method. Rest a dry clip on the fork. Lower the fork flat until the clip touches the water. Slide the fork away slowly.
- Look from the side at eye level. Can you see a dent in the water?
- Add more clips one at a time. Count how many float. Stop when one sinks.
- Compare the two methods. Which one floated more clips?
Match it to the grade
Watch the clip sink. Then watch the helper float one. Say sink. Say float. Look at the dent from the side. Help the helper count the clips.
Try the tissue method and the fork method. Count how many clips float for each. Say which method worked better. Draw the dent.
Repeat each method three times. Record how many clips floated each time. Find the usual number for each method. Explain why the clip floats even though steel sinks.
5Helper guide for older students
Your job
- Lead one group of three. Float a clip the day before so you know the tricks.
- Count the clips out and back in. You own the clip cup.
- Give each child a turn with every method.
- Ask questions and let the children try before you explain.
- Have the group look from the side at eye level.
Say things like this
- What do you think will happen? Why?
- What do you see around the clip?
- Let us change one thing and try again.
- That is a good guess. How could we test it?
Please do not
- Do not give away the answer before they test it.
- Do not let any clip leave the table.
- Do not let anyone bend or open a clip.
- Do not bump the table or the container.
- Do not say a guess is wrong. Say let us test it.
6Talk it over
Questions to ask
- What happened when the clip went in straight? What happened with the tissue or the fork?
- What did the water look like around the clip?
- Why did we need to be so gentle?
- What did we change and what stayed the same?
- Where have you seen a bug or a drop use the top of the water?
- Grades 4 and 5. Steel is denser than water. What was different about the way the clip met the water when it floated?
The science, in plain words
Water molecules pull on each other. At the top of the water, they pull sideways and inward. This makes the surface act like a thin stretchy skin. Scientists call this surface tension. A light object set gently on the surface makes a small dent. The surface pushes back up and holds it. Steel is denser than water, so a clip that breaks through the surface sinks. A paper clip is long and thin, so its weight spreads out along the wire. Oil from fingers, soap or a bump breaks the effect. That is why we use clean, dry clips and plain water. The tissue and fork only help place the clip gently. They are not the secret.
Where you see it
- A water strider walks across a pond on the surface of the water.
- Rain drops and dew drops form round beads.
- A cup filled to the brim bulges above the rim before it spills.
7If it goes wrong
| What you see | What to do |
|---|---|
| The clip sinks every time | Dry the clip and hold it by the ends. Use fresh water. Soap or oil on the water or your fingers will sink it. |
| The tissue sinks with the clip | Use a smaller square. Lay the clip down lightly. Let the tissue sink on its own. |
| The clip slides off the fork | Keep the fork flat. Lower it slowly. Slide it away sideways instead of lifting it. |
| The clip drifts to the edge and sticks | The water rises at the cup wall. Float the clip near the middle. |
| The clip wobbles and sinks | Keep the table still. No bumping and no blowing. |
| A film or bubbles sit on the water | Dump the water and refill from the pitcher. Rinse the cup with plain water. |
Clean up
- Count every clip back in. The helper checks the count
- Dry each clip with a paper towel
- Collect the tissue and forks
- An adult pours the water down the sink
- Wash hands with soap and water
Go further
- Try a clip with a different size. Does the size change how many float?
- Try a thin strip of foil. Does shape matter?
- Look at a drop of water on waxed paper. Why is it round?
- Set up a cup of plain water and slowly add a few more drops with a dropper. How high can the water bulge?
Built by Science Fenns for teachers and student helpers. Keep supervising every group the whole time.