
Teacher cards / Activity 27
For teachers and helpers. Adult supervised. Not for student screens.Color Wheel Spinner
What color do you see when red, yellow and blue spin together?

★The card
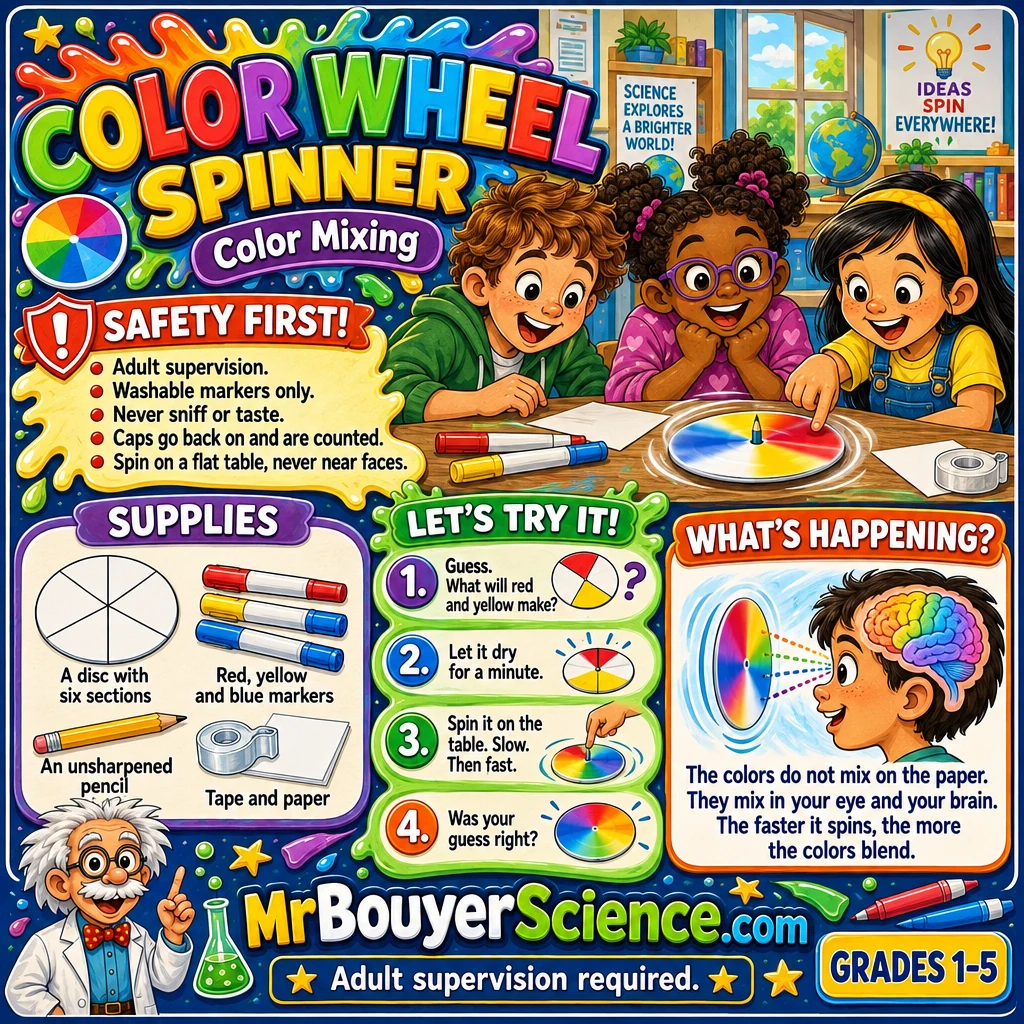
Put this card on the board for the class, or print it. Save the card
1Before class
The day before
- Make one finished spinner yourself so you know how it behaves.
- Cut twenty cardboard discs, 10 centimeters across, from cereal boxes or thin cardboard. An adult does all cutting before class.
- An adult makes the center hole in each disc using a scrap board underneath. Make the hole just big enough for the pencil to fit snugly.
- An adult draws six equal sections on each disc in light pencil, using a template.
- An adult rounds the writing end of each unsharpened pencil with sandpaper so it is dull and smooth. No sharp point goes to class.
- Use only washable markers that are water based with little smell. Open a door or window so the room is ventilated.
- Give your helpers the helper guide on this page. Let them make one spinner first.
Ten minutes before kids arrive
- Cover the tables with butcher paper or newspaper.
- At every table set four pre marked discs, six washable markers in red, yellow and blue, four unsharpened pencils, six tape strips, a recording sheet and a damp paper towel.
- Count the marker caps and the markers at every table.
- Open a door or window for fresh air.
- Put this card up on the board.
Safety and care
- The K to 5 teacher is the responsible adult in the room. A helper stays with every group the whole time.
- Use only washable, water based markers with little smell. Keep the room ventilated. Nothing is sniffed.
- Nothing is tasted or put in mouths. Marker caps are a choking risk for young children. Count them out and back in. Put each cap back on after use.
- An adult cuts the discs, makes the center holes and rounds the pencil ends before class. Children never use scissors, awls or sharp pencils.
- Spin the spinner on a flat table. Never near a face. Keep it below chest height.
- Cover the tables so the markers do not stain them. Wipe up spills right away.
- Wash hands before and after.
2Materials for 15 students
| Item | Per group | Whole class | Notes |
|---|---|---|---|
| Cardboard discs, 10 centimeters across, with a center hole and six sections | 4 | 20 | Three to color and one spare. Prepared by an adult. |
| Washable markers, red | 2 | 10 | Water based and low smell. |
| Washable markers, yellow | 2 | 10 | |
| Washable markers, blue | 2 | 10 | |
| Unsharpened pencils or short dowels with the end rounded | 4 | 20 | Used as the spinner shaft. Three plus one spare. |
| Masking tape strips | 6 | 30 | Hold the disc on the pencil. |
| Pencils for writing | 3 | 15 | |
| Plain paper, folded in half | 3 | 15 | Each child records what they see. |
| Butcher paper or newspaper to cover the table | 1 | 5 | |
| Damp paper towels | 3 | 15 | For marker hands and spills. |
| Fine sandpaper, adult use only | 1 | For rounding pencil ends before class. |
How to set up the room
- Seat each group of three at a covered table.
- Open a door or window so fresh air moves through the room.
- Keep the spinning area at the center of the table, away from edges.
- Keep a clear walking path for helpers.
3Run it in 30 minutes
Groups sit at their tables. Show the board. Hold up a red and a yellow section. Ask what color will appear when they spin.
Each child colors one disc. Child one uses red and yellow. Child two uses yellow and blue. Child three uses all three colors. Fill sections one color at a time, going around.
Helpers fit the pencils and tape. Spin slowly and then fast. Draw what you see. Swap discs and look again.
Bring the class together. Compare colors. Ask what happened to the three color disc.
Cap the markers. Count caps and pencils back in. Wash hands.
4What the kids do
- Predict. What color will red and yellow make when they spin? Draw or write your guess.
- Color your disc. Fill each section with one color. Go around the disc. Cap the marker when you are done.
- Wait one minute for the markers to dry.
- Your helper pushes the pencil through the hole and tapes it above and below the disc.
- Hold the top of the pencil. Spin it on the table. Try slow. Then try fast.
- Draw what you see. Swap discs with your group and look again.
- Compare your guess with what you saw. What changed when you spun faster?
Match it to the grade
Color a disc with two colors and watch it spin. Name the color you see. Say which colors blended.
Make three discs. Record what each one looks like when spinning. Compare with your guess.
Test slow and fast spins. Record both. Make a chart. Explain why the three color disc looks gray or brown.
5Helper guide for older students
Your job
- Lead one group of three. Run the activity once before class so you know the steps.
- Fit the pencil and tape for each child.
- Count marker caps out and back in.
- Keep spinning low and on the table.
- Give each child a job and rotate the jobs.
- Ask questions and let the children try before you explain.
Say things like this
- What do you think will happen? Why?
- What colors do you see now?
- Let us change one thing and try again.
- That is a good guess. How could we test it?
Please do not
- Do not color the disc for the child.
- Do not give away the answer before they test it.
- Do not let anyone spin a disc near a face.
- Do not let any cap or marker go in a mouth.
- Do not say a guess is wrong. Say let us test it.
6Talk it over
Questions to ask
- What color did the first disc turn into when it spun?
- What happened when the disc spun faster?
- What did you see with all three colors together?
- What did we change each time? What stayed the same?
- Where have you seen colors that blend when you look from far away?
- Grades 4 and 5. Why do the colors blend in your eye and not on the paper?
The science, in plain words
When the disc spins fast, each color flashes past your eye too quickly to see apart. Your eye keeps each image for a very short time, and your brain blends the flashes into one color. Red and yellow blend toward orange. Yellow and blue blend toward green. All three blend toward a dull gray or brown. Marker colors are pigments, and pigments absorb light, so the blend looks darker and duller. A famous disc made with the colors of the rainbow blends toward white, but real marker colors rarely make a perfect white.
Where you see it
- Screens use tiny red, green and blue dots that your eye blends into full color.
- Newspaper and comic book pictures are printed with tiny colored dots that blend from far away.
- Dot paintings by an artist named Georges Seurat blend when you stand back.
7If it goes wrong
| What you see | What to do |
|---|---|
| The disc wobbles | The pencil may be tilted or the hole off center. Re center the disc and add tape. |
| The disc slips on the pencil | Add another wad of tape above and below the disc. |
| The colors look streaky | Spin faster. Make sure the sections are equal and the color fills each one. |
| The three color disc looks brown, not white | That is normal. Marker colors blend toward a muddy gray or brown. |
| The color bleeds through the cardboard | Color lightly. Let it dry. Use a fresh disc if needed. |
| The pencil moves across the table | Hold the top of the pencil and spin in the center of the table. |
Clean up
- Put caps back on every marker
- Count markers, caps and pencils back in
- Peel up the table covering
- Wipe up any marker with a damp towel
- Wash hands
Go further
- Make a disc with thin stripes of two colors. Does it blend more or less?
- Make a disc with black and white sections. What shade do you see?
- Color half the disc one color and half another. What do you see?
- Color a ring of one color around the edge and another in the middle. What blends?
Built by Science Fenns for teachers and student helpers. Keep supervising every group the whole time.