
Teacher cards / Activity 02
For teachers and helpers. Adult supervised. Not for student screens.Bending Light with a Pencil
Why does a pencil look broken when it sits in water?

★The card
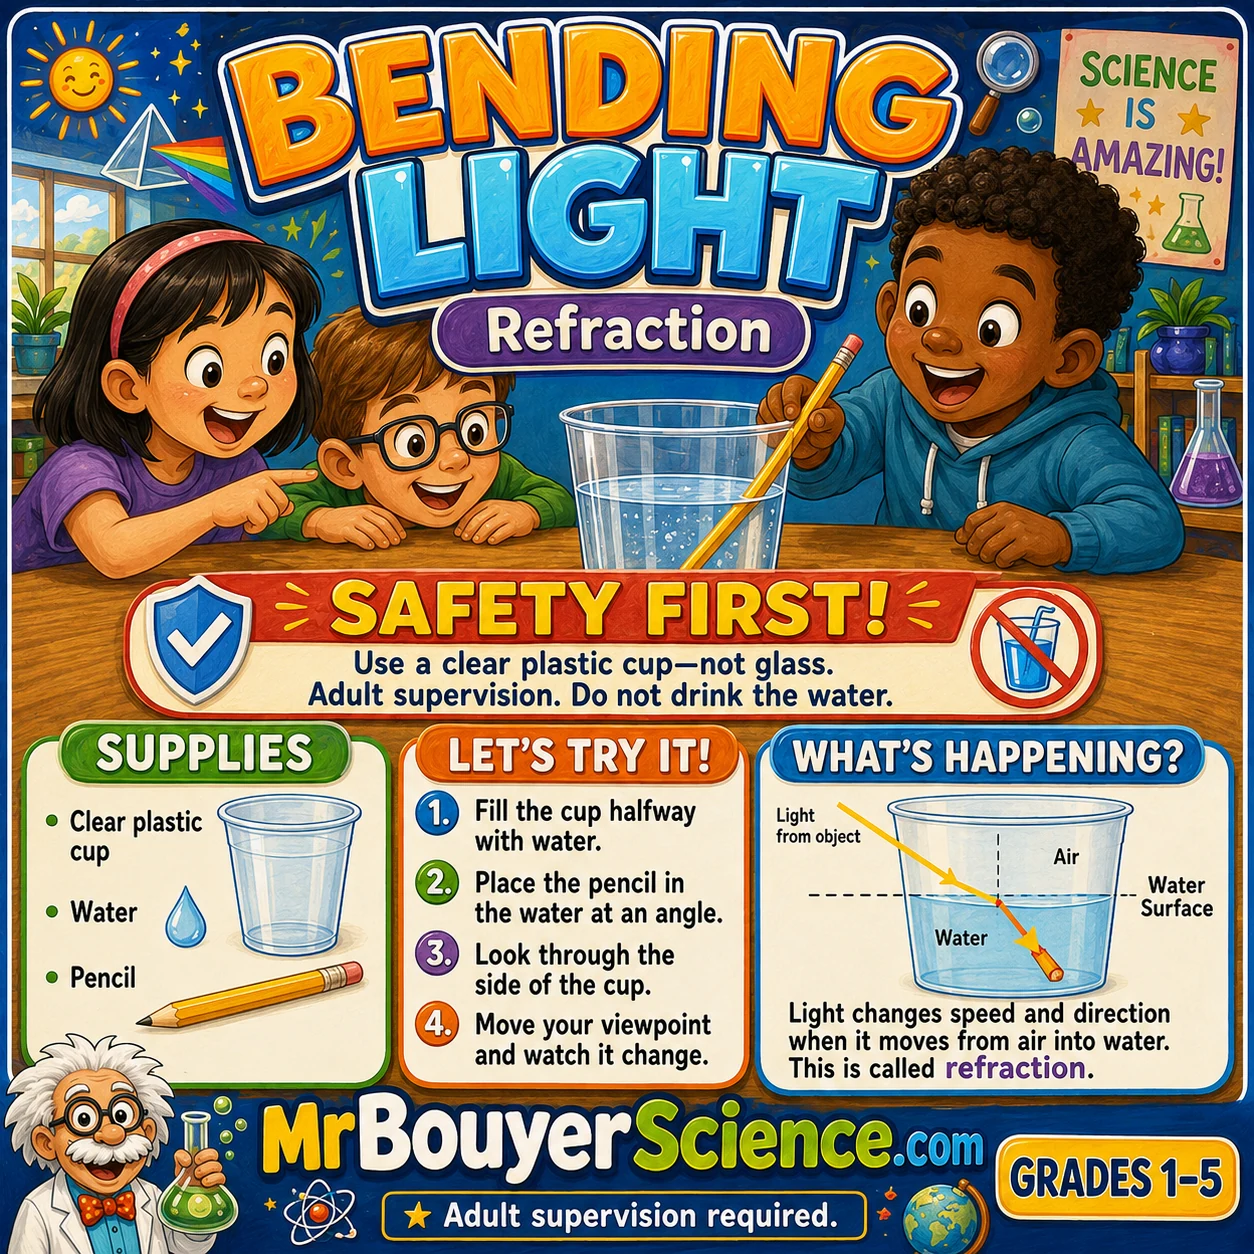
Put this card on the board for the class, or print it. Save the card
1Before class
The day before
- Try it yourself first. It takes two minutes and shows you exactly what the children will see.
- Use clear plastic cups only. Check every cup for cracks. No glass.
- Sharpen the pencils before the day. Then dull each point on scrap paper so it cannot poke. Children never sharpen pencils in class.
- Ask the K to 5 teacher to remind the class that nobody drinks the water.
- Give your helpers the helper guide on this page. Let them try the pencil trick before the children arrive.
- Pick tables with a plain top. A busy tablecloth makes the bend harder to see.
Ten minutes before kids arrive
- Set one tray at each of five stations.
- Put one empty clear cup in the middle of each tray.
- Fill five small pitchers with plain room temperature tap water. Put one beside each tray.
- Lay one dulled pencil, one hand towel, three writing pencils and three folded sheets of paper at each station.
- Keep the floor towels and the paper towels by the door.
- Put this card up on the board.
Safety and care
- The K to 5 teacher is the responsible adult in the room. An adult stays with every group for the whole activity. Helpers are teenagers and lead under that adult.
- Clear plastic cups only. No glass at any station.
- Nobody drinks the water. Nothing goes in mouths.
- Pencil points can poke. The points are dulled before class. Children hold a pencil by the top end and never point it at a face or an eye.
- Water on the floor is a slip risk. Wipe up every spill at once with a floor towel. Keep children seated while they work.
- Plastic cups tip easily. Keep cups on the tray and away from the table edge. Fill only halfway.
- Wash hands at the end.
2Materials for 15 students
| Item | Per group | Whole class | Notes |
|---|---|---|---|
| Clear plastic cups, 9 ounce | 2 | 10 | One is a spare. Plastic only. No glass. |
| Dulled pencils for the water test | 1 | 5 | Sharpened and dulled by an adult before class. Yellow pencils show up best. |
| Small pitchers of room temperature water | 1 | 5 | Plain tap water. Nothing added. |
| Trays with a rim | 1 | 5 | Baking sheets work. They catch spills. |
| Hand towels | 1 | 5 | For small spills and wet hands. |
| Floor towels | 2 | Keep by the door. Use at once on any floor spill. | |
| Paper towels | 1 roll | For wiping the outside of the cups. | |
| Pencils for writing | 3 | 15 | |
| Plain paper, folded in half | 3 | 15 | Each child draws what they see. |
How to set up the room
- Set the five stations around the room with room to walk between them.
- Seat the three children of each group side by side at one table, or on the floor around a low tray. Seat them so each child sees the cup from the side.
- Keep every cup near the middle of the tray and away from the edge.
- Keep the door area clear so helpers can reach the floor towels fast.
3Run it in 30 minutes
Groups sit at their stations. Show the board. Ask for a guess. What will a pencil look like in a cup of water?
The helper fills each cup halfway over the tray. Each group lays out its pencil and towel.
Each child takes a turn holding the pencil in the water. Look from the side. Look from above. Move your head slowly. Everyone draws what they see.
Bring the class together. Compare drawings. Ask why the pencil looked bent.
Pour out the water. Dry the trays. Return the cups and pencils. Wash hands.
4What the kids do
- Look at the empty cup. Then your helper fills it halfway with water over the tray.
- Hold the pencil by the top end. Slide it into the water at a slant.
- Look at the pencil from the side, right through the cup. What do you see?
- Now look down from above the cup. Does the pencil still look bent?
- Move your head slowly left and right. Watch the bend move.
- Lift the pencil out. Is it still straight?
- Draw what you saw. Draw the pencil and the water line.
Match it to the grade
Hold the pencil in the water and look. Say what you see. Draw a straight pencil and a bent pencil. Take it out and see that it is still straight.
Look from the side and from above. Draw both. Say which view shows the bend best. Say whether the pencil is really bent.
Draw the light path in a simple picture. Try three pencil angles and sketch each. Explain in a sentence why the pencil looks bent. Use the word refraction.
5Helper guide for older students
Your job
- Lead one group of three. Try the pencil in water the day before so you know what the bend looks like.
- Fill each cup halfway over the tray. The children do not pour.
- Give each child a turn with the pencil and a turn to watch.
- Ask questions and let the children look before you explain.
- Wipe up any water on the floor at once.
Say things like this
- What do you see? Tell me about it.
- What happens when you move your head?
- Is the pencil really bent? How can we find out?
- That is a good idea. Let us test it.
Please do not
- Do not explain refraction before the children have looked.
- Do not let a child point the pencil at a face or an eye.
- Do not let anyone drink the water.
- Do not leave a cup near the table edge.
- Do not say a guess is wrong. Say let us look again.
6Talk it over
Questions to ask
- What did the pencil look like above the water? What about under the water?
- What changed when you moved your head?
- Is the pencil really bent? How could we check?
- Did the pencil look the same from the side and from above?
- Where have you seen something look bent or shifted in water?
- Grades 4 and 5. Light travels slower in water than in air. How could that make a pencil look broken?
The science, in plain words
Light moves a little slower in water than in air. When light crosses the water surface at a slant, it changes direction. This bending is called refraction. Light from the underwater part of the pencil bends as it leaves the water on its way to your eye. Your brain assumes light always travels straight, so it places the underwater part of the pencil in the wrong spot. The pencil looks broken or shifted at the water line. The bend is strongest when you look from the side and fades when you look straight down. The curved cup of water also works like a weak magnifier, so the pencil can look wider than it is.
Where you see it
- A straw in a drink looks broken at the water line.
- A swimming pool looks shallower than it really is.
- Raindrops bend light and help make a rainbow.
7If it goes wrong
| What you see | What to do |
|---|---|
| The pencil does not look bent | Look from the side at the water line, not from above. Tilt the pencil more. Add a little water so the line is higher on the cup. |
| Everything looks blurry | Wipe the outside of the cup. Fingerprints and drops blur the view. Check that the cup is clean and clear. |
| The pencil looks fat | The water and the curved cup work like a magnifier. Great thing to talk about. Do not call it wrong. |
| The cup tipped | Wipe the table and floor at once. Put the cup back in the center of the tray. Fill only halfway next time. |
| The pencil floats and will not stay put | Lean it on the rim of the cup. A longer pencil leans better. |
| A child wants to drink the water | Remind the group that nothing is tasted. Pour out the water early if needed. |
Clean up
- Pour the water back into the pitcher or a sink
- Dry the tray, the table and the outside of every cup
- Check the floor and wipe any drops
- Return pencils, cups and towels to the kit
- Wash hands
Go further
- Try a straw or a spoon instead of a pencil.
- Try more water and less water. Does the bend change?
- Draw an arrow on paper. Hold it behind a cup of water. Move the paper back slowly. What happens to the arrow?
- Put the pencil in at different slants. Which slant looks the most broken?
Built by Science Fenns for teachers and student helpers. Keep supervising every group the whole time.